
Wednesday, July 6, 2011
We're linking up on Etsy and Twitter....
That's right, just look for Doodles and Dabbles on Etsy and Twitter to keep track of what we're up to.
Monday, March 28, 2011
It's the perfect time to get out of the 'artistic box'
 Yes, it's true spring is on the way! There's something about cleaning off the patio and garden area that makes me want to revisit some of my favorite things; plants, birds, butterflies, and outside mosaic projects.
 This birdbath is among my favorite projects. Why? Instead of trying to make defined mosaic sections and designate colors for here or there, I went fully freestyle. It gave me a great opportunity to incorporate some of my miscellaneous items.
Among the items used in this birdbath is a statue of a lady which caught my eye at a local thrift store long before I began the project. At the time I bought her, I had no idea what she would become or if she'd become a part of something. I just knew that the way she gazed at me, from the shelf above, was as if she was awaiting a lost love or longing for something. I had to have her; she needed me.

This birdbath is about venturing out, about seeking new things, and exploring the 'what ifs'.
It's about exploring and seeing what might come to be. It's a reminder to get out of the house, the physical box many of us remain in throughout the winter season, and a reminder to get out of the mental - and artistic box - too.
Personally, I get so used to doing things the same way or following a 'creative signature' that I get stuck. Stuck in a way of thinking and creating. Stuck in a way that doesn't allow me to explore new paths, new ventures, new ... everything. Spring nudges me to get out of my artistic box and explore the 'what ifs'!
Run with me through the paths of the unknown. Let's see where it takes us. It's sure to be somewhere wonderful, somewhere new, somewhere... magical.
I'm off to create... something!
Monday, March 21, 2011
Another giveaway...
Yep, you read that correctly. The Halloweenqueens are holding a giveaway! Check it out: http://artisticthalloweenqueens.blogspot.com/2011/03/easterween-giveaway.html
As much as I'd like to have the goodies, I always share giveaways with others.
Good luck everyone!
Off to create... something
JT
As much as I'd like to have the goodies, I always share giveaways with others.
Good luck everyone!
Off to create... something
JT
Sunday, March 6, 2011
Flower Fairies Spring to life...
It's time to think spring and what's 'springier' than flowers? Flowers and Fairies and Sprites along with other garden delights! Can't you just picture flowers coming to life as fairies? I can!
While thrifting last week, I found a pair of bold print pants for $1.
I knew the minute I saw the pants that they would become my 2nd flower fairy.
I gathered my basic supplies.


I painted on ballerina shoes and clear coated her face, hands and legs.


While thrifting last week, I found a pair of bold print pants for $1.
I knew the minute I saw the pants that they would become my 2nd flower fairy.
I gathered my basic supplies.
Plastic egg, air dry clay, wire, glue, paint, glitter glue, pedal fabric (the pretty blue pants!), other potential fabric for her dress, potential trim lace/other, thread and clear coat.

I covered the egg with a thin layer of air dry clay. The clay takes forever to dry over the plastic egg.
If you're impatient, you might prefer using a foam ball or a ball of newspaper or foil - they dry faster!

While the body is drying (a couple days or so), cut out the flowers from the pants/skirt/shirt you picked for your pedals and/or leaves. If you want leaves on your piece, like I did with this yellow and orange fairy, you need to place the pedals against her face first. Then attach the leaves.
Add wire for arms and legs. I found it useful to duct tape them in place.
Also add the face, head and neck, bulking/sculpting it out with clay as needed.
I used a mold to create the face and then I 'tweaked' it slightly.
Be sure to put clay over the wires and duct tape.
You'll probably need to let it dry for another couple of days before trying to sculpt the arms, legs, feet and hands (the head, arms and legs tend to move out of position when one tries to do it all in one step).

Paint your dried body with flesh tone paint. Paint her eyes, lips and other facial details. Let dry.
Use pvc glue and place pedals/leaves around the fairy's face.
Use glue, or Stiffy, to shape the pedals into position.
I went about layering the pedals around her face, and shoulders.
Mini scissors, tweezers and tooth picks work well for pushing the pedals into place.
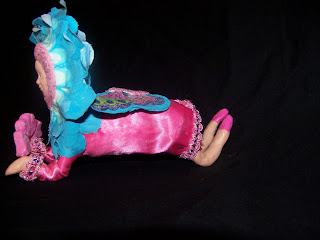
If your fairy comes to life, as mine did, she'll begin to speak to you. Her voice will be strong and her words clear. My fairy wanted to be a blue flower fairy with accents of pink and insisted I dress her the way I imagined her in the beginning (there are times when one speaks to me and say 'no way I'm wearing that!' which means I have to alter my plan and see what happens.
Her wings were created from a butterfly print nurses scrub. I cut the butterflies out the same way I cut out the pedals. I used glitter paint to cover each color of the wings, front and back, to give them sparkle. I wrapped a piece of wire around them so I could insert them into later.
The vivid pink satin became her dress and mini shorts. I simply tucked the fabric around her to form her shorts and tacked it in place on the sides, as if I diaper. Her dress was estimated by putting a piece of fabric around her with the opening at the back. I drilled a hole for the of wings, and mounted them with glue. Then I stitched her dress on above and below the wings and around her neck and shoulders.
A week before making her, I had found a great trim piece with lots of metallic colors - blue, yellow, pink and green - mixed in. The trim was too wide for the scale of my fairy so I cut it in half - perfect!
Hope was created with a mini heart cutter. I stuck a piece of wire through each heart, wiggled it a bit to make it slightly loose and let them dry. Once dry, I slid them off the wire, sanded them lightly, painted, sealed and restrung them. I wrapped the ends of the wire around her wrists and covered it with trim. Hope just seems to fit, given her optimism and joy as spring approaches.
Tada! At last she came to life!
Now, she's ready to lounge about in the sunshine and play with others.
I wish the photos would show all the shimmer and shine she has in person!


Thanks for visiting my blog. I hope you enjoyed the process of "When flowers come to life" and my little flower fairies.
I'm off to create... something!
Friday, February 4, 2011
Playing in the studio more than ever...
I have been out of work for several weeks due to a back injury. During those weeks, I've tried to get more things done for my company. Somehow the marketing, and other business tasks keep being put off in order to play in the studio. Why is it the creation part is so much more fun?
Here are some new creations by Doodles and Dabbles - enjoy!

Dottie - Mini secret keeper

Cool Chick - Mini Secret Keeper
Cool Chick and Dottie are mini secret keepers, so they might be large enough to store a ring or other small jewelry.


Thanks for stopping by and for supporting Doodles and Dabbles.
I'm off to create... something!
Sunday, January 30, 2011
Valentine's Day ...
Valentine's Day is fast approaching and I'm elbows deep in ... tons of things.
Yes, glitter is involved! There was an minor accident in the studio last week when a new container of glitter exploded!!! I'm a down to earth person, but that day I got lots of 'bling'. Nothing sparkles like glitter! Hey, I can still be a manly man and wear pink and red glitter. Right?
This year I attempted to make Valentine's ornaments for the first time. Here are some photos of my completed ornaments. I plan to have more completed in the next couple of days. Stay tuned!


I'm off to ... create!
Sunday, January 2, 2011
Looking for something to do?
As of today, January 5, 2011, the City Island Public Library's foyer is displaying some of Doodles and Dabbles' art dolls. The City Island Library is located on City Island, just east of downtown Daytona Beach, Florida. Simply follow Beach Street to Magnolia Avenue and take the bridge to the library.
You can make a day of it if you stop by the library on a Saturday. First, check out Doodles and Dabbles' display, which will be up throughout the month of January. Then go into the library and rent video and/or dvd for free! After grabbing your movie(s) of choice, you can hop across the parking lot and hit the Farmer's Market (8 a.m. - 12 p.m.) to stock up on veggies for the week. Next, go downtown and check out one of the local eateries, grab a bite to eat and support local small businesses. You can remain parked in the library's parking lot the whole time and get in a nice walk, too.
Talk about a fun filled and productive day!
It's a new year and Doodles and Dabbles is looking forward to our best year yet. The studio has finally been rebuilt after the storm forced remodel courtesy of Tropical Storm Fay, in 2008. We had a great sales season throughout Christmas 2010. Plus,. we've been super busy creating many unique pieces which will be unveiled in the January display at The City Island Library. Hint: Do you like Alice in Wonderland?
The library prohibits pricing items that are on display. However if an item is in the display, then it's available for purchase. Feel free to contact Doodlesndabbles@aol.com or to discuss product viewing and pricing. Items are reasonably priced and guaranteed to be one of a kind. There are many items available (other dolls, mosaic work etc.) that will not fit, or are too heavy, to be put in the display case. Keep in mind much of our art is commission based, such as portraits, caricatures, poetry, murals, pet memory stones and cannot be displayed. Need art? Contact us! If we can't met your art needs, we probably know someone that can.
It's sure to be a great year for Doodles and Dabbles! We thank those of you who have been valued customers. We also look forward to working with new customers throughout the coming year.
Sincerely,
James Tripp
Owner of Doodles and Dabbles
A Mixed Media Art Business
Daytona Beach, Florida
Tuesday, November 16, 2010
A fast approaching show date..
It's an exciting time for Doodles and Dabbles as many dolls and secret keepers are in the finishing stages. Many new, one of a kind, items will be offered at the Turkey Run (http://www.daytonacarshows.com/ for more information on the event) over Thanksgiving weekend.
We have started an animal series of mini secret keeper (minis are about 6" - 8" tall) - think lions and tigers and bears (and more), oh my! - that we are in love with because these animals are adorable (if we do say so ourselves!). We also have a couple of other dolls nearing completion, including a couple movie themed dolls. Nope, we're not telling you what characters or what movie just yet. You'll have to wait until they are done and photos are posted.
By the end of the week, pictures should posted to this blog so please check back in!
We're super excited!!!
Tuesday, October 26, 2010
Soon... very soon, I'll be...
Soon... very soon, I'll be introducing you to a few new art dolls and secret keepers. I can't wait to see how they turn out, you can?
As usual, I had a vague idea of what I might do when I started each piece, but as they progress they always take on a life of their own. They 'talk' to me and tell me what they want to become and how they want to be presented to the world.
Here's a little lady that has come to life, meet Ms. Wildflower!


Back to work...
Or is it play?
Friday, October 22, 2010
A crafting tip!


I recently purchased the Walnut Hollow Clay Embossing Set, and I'm very happy with it overall. However, I did find it very difficult to find the letter I wanted when I wanted it. Part of reason for having trouble seeing them is my eyes are getting worse as I get older, and part of it is because the embossing letters are the same color of plastic as the base of the letters. Well, I took it upon myself to 'tweak' the manufacturer's product so that it'll be easier for me to use.
Materials needed:
toothpick(s)/or small paint brushes
acrylic paint (I picked black but you can use any color you choose)
spray on clear coat
After separating the letters from the breakaway packaging, I dipped a toothpick into the paint and gently touched the letter area with the paint. It needs to be a thin coat so that it doesn't alter how well the embossing letters work. After the acrylic paint dried, I put on a clear coat. I put on several coats of clear, allowing it to dry completely between coats. My theory is that the clear coat will lead to the acrylic staying on longer. I can surely find the letter I'm looking for *much* faster than I could when they were all one color. Check it out in the photos and you'll see how much more the letters pop! Yes, it did take some time to cover each letter but I figure the time it took will more than pay off considering each letter will be much easier to find with *every* project I do. Long term goal? Time saved!
If Walnut Hollow were to ask me to review the kit (I'd love to be asked to review new products. Talk about a dream job! How fun would *that* be?!), I'd say I love, love, love my Walnut Hollow Clay Embossing Set overall and I recommend it for every clay artist and scrapbooker (No, I do not have any affiliation with Walnut Hollow. This is a review from one consumer, me, that's all)!
However, I'd suggest they change two things about it:
1) Color the text portion of the embossing stamps to make them easier to read (if that's even possible within the manufacturing process).
2) Add a few more of the blue letter holders to the kit or create a package whereby they can be bought separately - maybe even in different lengths or a breakaway type letter holder. That way, one could preset letters in place for commonly used words or phrases - saving time!
Let's face it, many of us are limited by the amount of time we can spend in our creative spaces.
Therefore, everything needs to be organized, efficient and user friendly.
I hope you have found this tip helpful. Free free to share this tip with others, but please give the credit to Doodles and Dabbles when you do.
Therefore, everything needs to be organized, efficient and user friendly.
I hope you have found this tip helpful. Free free to share this tip with others, but please give the credit to Doodles and Dabbles when you do.
Thank you Walnut Hollow for creating another great product!
I'm off to craft... something!
James Tripp
Doodles and Dabbles
Subscribe to:
Comments (Atom)